
Email is an essential communication tool and nearly everyone has an email address (or two), but it’s ubiquitous nature makes it a popular target for unsolicited marketing messages, also known as spam. Millions of email messages are sent and received daily and some studies suggest at least half of all messages are spam. To combat this, email providers utilize sophisticated filters that attempt to sort the legitimate email (ham) from the unwanted messages (spam).
Spam filtering is an excellent tool email providers use to help manage the unending flow of unwanted email messages sent every day. Often, this process happens silently behind the scenes, but the process can become very apparent when you don’t receive a message you need. As good as spam filters are, mistakes can be made.
To keep your inbox clean from unwanted emails and to help protect you against malicious messages, Mozilla Thunderbird uses spam filtering. When messages go to the spam/junk folder, or when you want to make sure future messages don’t end up in junk, there’s a couple things you can do: mark messages as not junk and manually add the sender’s email address to your white list (address book). We’ll discuss these in more detail below.
Before you begin
Mozilla Thunderbird is an desktop email client. That means that Thunderbird is not your email service provider, but a client software used to access email stored online, typically by your email service provider or internet service provider (ISP). That service provider likely has their own spam filtering that will take place before Thunderbird fetches email from your online account. For best results, you should follow the whitelist instructions for both your email service provider and your email client, since they may both filter spam separately from each other according to a different set of rules.
Configure Junk Settings
Thunderbird uses per-account preferences for handling junk mail, so if you use Thunderbird to check email from more than one account, make sure you modify the settings for the desired account. To add an email sender to your whitelist, you first need to enable your address book to serve as your whitelist.
- Open Mozilla Thunderbird
- From the menu, select Tools, then Account Settings
- Select Junk Settings from the left navigation
- If it’s not already, place a check mark next to “Enable adaptive junk mail controls for this account“
- Under “Do not automatically mark mail as junk if the sender is in:” select the address book(s) you want to serve as a white list. Any contacts in that address book will not have their messages marked as junk
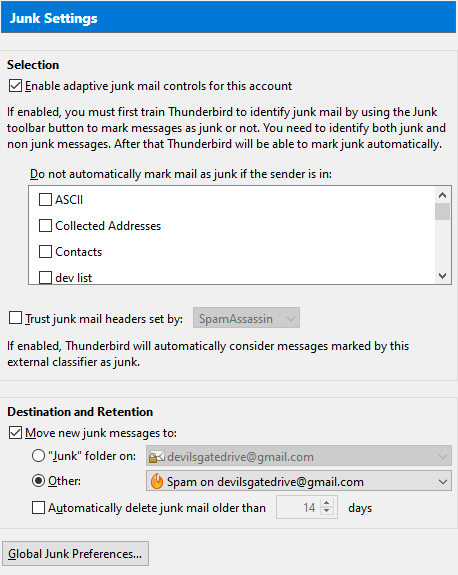
- Now, you can add a sender’s email address as a contact in your address book to whitelist that sender (instruction on this below)
Add contact to Thunderbird Address Book
Now that your address book doubles as your whitelist, you need to add the sender’s email address as a contact in your address book. You can access the Address Book from the main window, the compose window or any message window.
To access the Address Book
- From the top menu, select Tools, then Address Book
- Select the Address Book icon on the toolbar
- Press Ctrl+2 on your keyboard
Contacts can be added in several ways: from directly within the address book, from message headers or from the body of any message
Adding contacts from within the Address Book
- From the top menu, select File, then New > Address Book Card
- Select the New Card icon on the toolbar
- Press Ctrl+N on your keyboard
Adding contacts from an email message
If the desired contact address is located in a message header, select the contact and then select Add to Address Book. If the desired contact address is located within the email message text, right-click the contact and select Add to Address Book.
Mark a message as not junk
You can train Thunderbird’s adaptive filter by telling it the messages you consider to be not junk. You’ll need to review the messages in your Junk folder to find the desired message and then mark it as not junk. Messages in junk are deleted regularly, so you should routinely review your junk folder to see if there’s messages there that have been classified incorrectly.
- Open Thunderbird
- Select the Junk folder
- Find the desired message and select it in the list
- Select the Not Junk button or press shift+j (uppercase “J”) on your keyboard
Did this guide work for you?
Let us know if this guide for Thunderbird worked for you in the comments below. While we strive to keep our guides up-to-date and relevant, sometimes things change without notice. If you find something is different in Mozilla Thunderbird from this guide, let us know what you had to do differently. Thanks for your help and input!