
Email is an essential communication tool and nearly everyone has an email address (or 12), but it’s ubiquitous nature makes it a popular target for unsolicited marketing messages, also known as spam. To combat this, email providers utilize sophisticated filters that attempt to sort the legitimate email (ham) from the unwanted messages (spam).
Spam filtering is an excellent tool email providers use to help manage the unending flow of unwanted email messages sent every day. Often, this process happens silently behind the scenes, but the process can become very apparent when you don’t receive a message you need. As good as spam filters are, mistakes can be made. When that happens, you have some tools to correct the mistake.
To keep your inbox clean from unwanted emails and to help protect you against malicious messages, Mail.com has various spam-fighting methods. If you’re not receiving email from certain senders, you’ll first want to check your spam folder for those messages and mark them as “not spam” if you find them there. Next, you can add the email address of the sender to your Mail.com email account’s white list (or safelist). Below, we’ll detail the steps for your Mail.com Email account to help keep the email you want out of spam.
Mark message as not spam
Mail.com utilizes a “personal spam filter” that you can train separately to handle your email the way you want. When you first use your mail.com mailbox, your personal spam filter is empty. Your personal spam filter is not trained until you click Spam or Not Spam to move incorrectly routed e-mail messages into the Spam or the Inbox folder. The same occurs if you move e-mails to the Spam folder or the Inbox folder by drag & drop or using the Move button.
To mark a message as not spam:
- Log in to your Mail.com email account from a desktop/laptop computer
- Select E-mail from the top navigation
- Select Spam from the left menu
If Spam isn’t visible, select Display additional folders first
- Find and open the desired email
- Select the Not spam button at the top
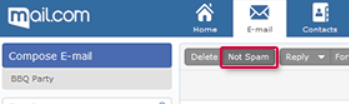
The message will be moved to your inbox and the sender will be marked as safe. To white list a sender preemptively, that is, before one of their messages end up in spam, use the white list method below.
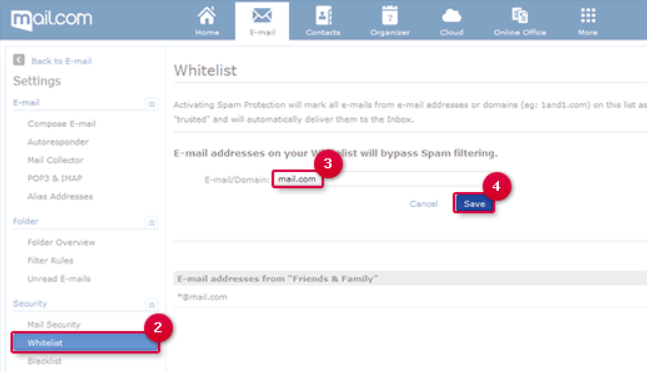
Add a sender to the white list
Email senders added to your Mail.com white list are treated as trustworthy by the spam filter, so messages from senders on your white list are never sent to the spam folder.
- Log in to your Mail.com email account from a desktop/laptop computer
- Select E-mail from the top navigation
- Select Settings
- From the left-side navigation menu, under Security, select Whitelist
- In the E-mail/domain field, enter the email address of the sender you want to white list
- Select Save
For more help
Receiving
If you need more help receiving email messages as a Mail.com user, visit the Mail.com customer support site.
Sending
If you’re an email sender having trouble sending email to Mail.com users, visit the Mail.com Postmaster site.
Did this guide work for you?
Let us know if this guide for Mail.com worked for you in the comments below. While we strive to keep our guides up-to-date and relevant, sometimes things change without notice. If you find something is different in your Email.com Email account from this guide, let us know what you had to do differently. Thanks for your help and input!
Photo by JESHOOTS.COM on Unsplash
2 replies on “How to whitelist in Mail.com (updated for 2021)”
Thank so much and i hope that i do get the scholarship
New email