
If you’re using webmail from Private Email (from Namecheap) and email messages are ending up in your Spam folder that you don’t want there, you can add email addresses to your trusted senders list (also known as a white list or safe sender list) to keep that from happening. Messages sent from your trusted senders will not be sent to your Spam folder.
Add an email address to the trusted senders list
When making entries into the whitelist, several security measures are circumvented. Only enter email addresses or domain names in the whitelist if you absolutely trust messages from them.
- Sign into your Private Email account on the web
- Select the Settings icon ⚙️found in the top-right
On mobile, select your profile icon first, then Settings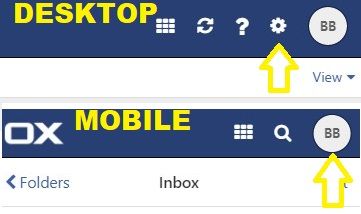
- Select Security
- Under the Mail heading, in the box under Always trust mails from the following senders, enter the email addresses of the sender(s) and/or domains you want to treat as trusted
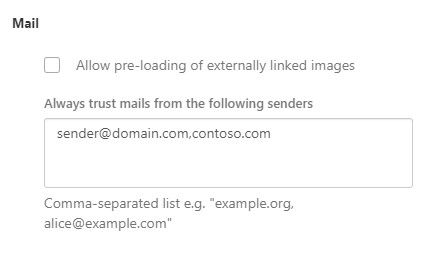
When entering multiple addresses or domain names, separate the entries with a comma.
All email messages from senders who are recorded in the whitelist, are treated as follows:
▪ The message is not treated as unwanted
▪ The email source is labeled as trustworthy
▪ Externally linked images are immediately loaded and displayed
Did this guide work for you?
Let us know if this guide for Private Email by Namecheap worked for you by leaving a comment below. While we strive to keep our guides up-to-date and relevant, sometimes things change without notice. If you find something is different in your Namecheap Private Email account from this guide, let us know what you had to do differently. Thanks for your help and input!
Photo by Tim Mossholder on Unsplash